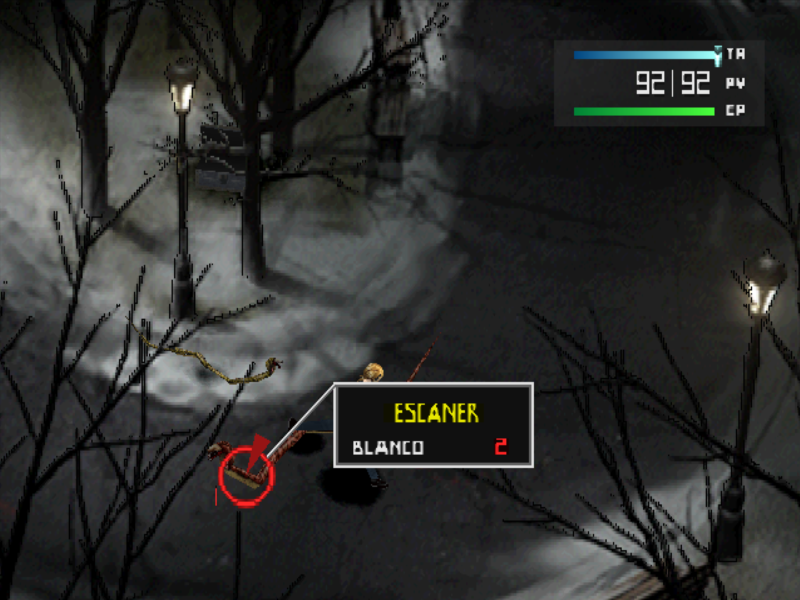
Everything is ready and now the game is in the beta-testing stage, so keep visiting my blog as I will post the patch soon.
Thank you Gadesx for the testing.
Friday, September 6, 2013
Friday, August 23, 2013
Step 16: insert the texts
As you already know, CUE is
taking care of the romhacking side of this project. He developed some
tools that are able to insert the script in the game after the translation is finished. I
don't have permission to upload these tools so if you wish to translate
this game you will have to contact him.
Step 15: translate the texts
When you extract the script you will get 20 different TXT files. I recommend you to open them with and advanced text editor like Notepad++, I recommend you to activate the XML structure so you can see very clearly what needs to be translated.
Untranslated txt.zip
Translate them very carefully, respect the tags. Keep in mind that each line should not exceed the lenght of 35 characters, more or less.
Untranslated txt.zip
Translate them very carefully, respect the tags. Keep in mind that each line should not exceed the lenght of 35 characters, more or less.
The files must be saved in ANSI format, not Unicode. Remember that the only characters that you can use are the ones that you have in the character set:
Friday, July 26, 2013
Step 14: extract the texts
Wednesday, July 10, 2013
Step 13: check your translation
When you are done with the SLUS translation you should insert the SLUS into the game ISO using CD-Mage and check how it looks like.
Go find an enemy, apply the command Scan and:
As you can see the translation was perfectly applied. Not bad, huh?
Go find an enemy, apply the command Scan and:
As you can see the translation was perfectly applied. Not bad, huh?
Sunday, July 7, 2013
Step 12: SLUS translation
Now that we have translated the graphics and changed the width of our new characters, I think it's time to translate the game.
First we will focus on the SLUS file, it's a tiny file and it contains a few texts:
As you can see these are the messages that appear when you apply the command "Scan" over an enemy, so here we have some space limitations as each one of these messages cannot exceed the lenght of a single line.
To translate these texts we will need the following tool developed by CUE:
slus_msg.zip
Put all those files in the same folder.
Now open slus_msg.asm with any text editor, I recommend you Notepad++. Go to the end of the file where you will see this:
Now you will have to translate those grey texts. Do not delete the quotation marks. After you are done, save and close the file.
Next step, open the file slus_msg.tbl with any text editor. Add your new characters after their corresponding hex code:
When you are done save and close the file.
Now double click the file translate.bat and that's it, now your translated messages are included in the SLUS.
First we will focus on the SLUS file, it's a tiny file and it contains a few texts:
- "HP ????/????"
- "HP #/#"
- "Susceptible to poison"
- "Susceptible to acid"
- "Easily tranquilized"
- "Sensitive to heat"
- "Sensitive to cold"
- "Objects easily stolen"
- "Gets confused easily"
- "Failed to escape"
- "Can't escape!"
As you can see these are the messages that appear when you apply the command "Scan" over an enemy, so here we have some space limitations as each one of these messages cannot exceed the lenght of a single line.
To translate these texts we will need the following tool developed by CUE:
slus_msg.zip
Put all those files in the same folder.
- slus_msg.asm
- slus_msg.tbl
- translate.bat
- SLUS_006.62
- armips.exe
Now open slus_msg.asm with any text editor, I recommend you Notepad++. Go to the end of the file where you will see this:
Now you will have to translate those grey texts. Do not delete the quotation marks. After you are done, save and close the file.
Next step, open the file slus_msg.tbl with any text editor. Add your new characters after their corresponding hex code:
When you are done save and close the file.
Now double click the file translate.bat and that's it, now your translated messages are included in the SLUS.
Tuesday, July 2, 2013
Step 11: width of the new characters II
Some days ago we changed the width of our new characters in the SLUS file. This SLUS file contains the width of the characters that appear in dialogs, but not characters that appear in the menu. Of course this was discovered by CUE.
To change the width for the menus we will have to open the big file called PE.IMG using an hex editor, for instance HxD.
Open HxD
Edit > Search > Go to...
Go to 02B160, and there you will see the characters width. This time we won't have to do any trick with the assembler, just add our new values. You will have to add them after the 51 (do not touch that 51).
When I said that you have to add your new values, I mean that you have to overwrite the old ones (C0) and put yours over.
The structure of these characters is as follows:
For instance, let's focus on the letter "I". It has a value of 41. The "I" itself has a width of 4, and then 1 white space is inserted before and after the character. That's the way it works.
So now you know how to change the width of your new characters. If you need help, here you have the width of the old English characters:
60 -> 0
60 -> 1
60 -> 2
60 -> 3
60 -> 4
60 -> 5
60 -> 6
60 -> 7
60 -> 8
60 -> 9
60 -> +
50 -> -
50 -> =
61 -> *
91 -> %
60 ->
80 -> A
70 -> B
60 -> C
70 -> D
60 -> E
60 -> F
70 -> G
80 -> H
41 -> I
60 -> J
80 -> K
70 -> L
A0 -> M
80 -> N
60 -> O
70 -> P
60 -> Q
80 -> R
60 -> S
60 -> T
80 -> U
80 -> V
A0 -> W
60 -> X
80 -> Y
60 -> Z
80 -> &
21 -> !
51 -> ?
41 -> "
21 -> '
21 -> .
70 -> a
70 -> b
60 -> c
60 -> d
60 -> e
60 -> f
70 -> g
80 -> h
40 -> i
30 -> j
70 -> k
40 -> l
A0 -> m
80 -> n
60 -> o
70 -> p
70 -> q
60 -> r
50 -> s
40 -> t
80 -> u
80 -> v
A0 -> w
60 -> y
80 -> z
50 -> :
21 -> ,
30 -> /
51 (leave this 51 alone as I said before)
To change the width for the menus we will have to open the big file called PE.IMG using an hex editor, for instance HxD.
Open HxD
Edit > Search > Go to...
Go to 02B160, and there you will see the characters width. This time we won't have to do any trick with the assembler, just add our new values. You will have to add them after the 51 (do not touch that 51).
When I said that you have to add your new values, I mean that you have to overwrite the old ones (C0) and put yours over.
The structure of these characters is as follows:
- The first number indicates the width of each character, expressed in pixels.
- The second number indicates the white space before and after the character.
For instance, let's focus on the letter "I". It has a value of 41. The "I" itself has a width of 4, and then 1 white space is inserted before and after the character. That's the way it works.
So now you know how to change the width of your new characters. If you need help, here you have the width of the old English characters:
60 -> 0
60 -> 1
60 -> 2
60 -> 3
60 -> 4
60 -> 5
60 -> 6
60 -> 7
60 -> 8
60 -> 9
60 -> +
50 -> -
50 -> =
61 -> *
91 -> %
60 ->
80 -> A
70 -> B
60 -> C
70 -> D
60 -> E
60 -> F
70 -> G
80 -> H
41 -> I
60 -> J
80 -> K
70 -> L
A0 -> M
80 -> N
60 -> O
70 -> P
60 -> Q
80 -> R
60 -> S
60 -> T
80 -> U
80 -> V
A0 -> W
60 -> X
80 -> Y
60 -> Z
80 -> &
21 -> !
51 -> ?
41 -> "
21 -> '
21 -> .
70 -> a
70 -> b
60 -> c
60 -> d
60 -> e
60 -> f
70 -> g
80 -> h
40 -> i
30 -> j
70 -> k
40 -> l
A0 -> m
80 -> n
60 -> o
70 -> p
70 -> q
60 -> r
50 -> s
40 -> t
80 -> u
80 -> v
A0 -> w
60 -> y
80 -> z
50 -> :
21 -> ,
30 -> /
51 (leave this 51 alone as I said before)
Subscribe to:
Posts (Atom)
.png)
.png)
.png)
.png)
.png)
.png)
.png)
.png)
.png)
.png)
.png)
.png)
.png)
.png)
.png)
.png)
.png)
.png)
.png)
.png)
.png)
.png)
.png)
.png)
.png)
.png)
.png)
.png)
.png)
.png)
.png)
.png)
.png)
.png)
.png)
.png)
.png)
.png)
.png)
.png)
.png)
.png)
.png)
.png)
.png)
.png)
.png)
.png)
.png)
.png)