
Friday, July 26, 2013
Step 14: extract the texts

Wednesday, July 10, 2013
Step 13: check your translation
When you are done with the SLUS translation you should insert the SLUS into the game ISO using CD-Mage and check how it looks like.
Go find an enemy, apply the command Scan and:


As you can see the translation was perfectly applied. Not bad, huh?
Go find an enemy, apply the command Scan and:
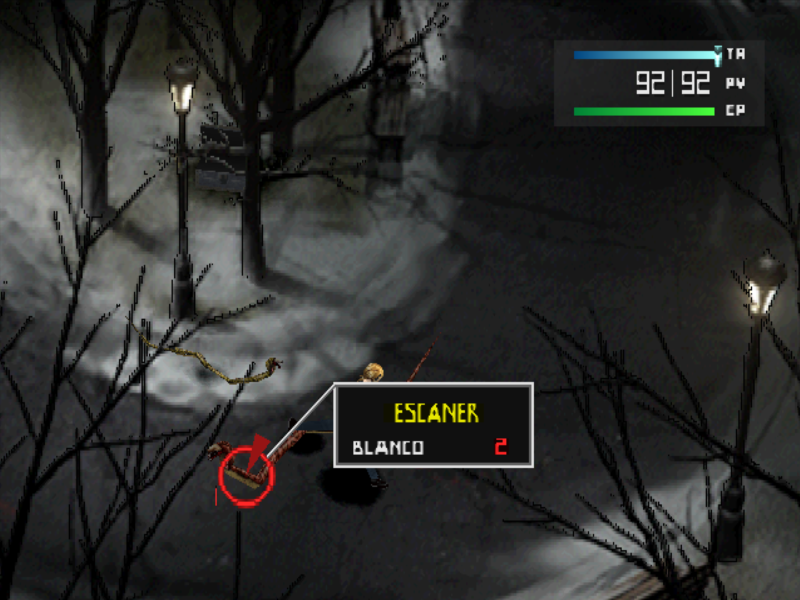


As you can see the translation was perfectly applied. Not bad, huh?
Sunday, July 7, 2013
Step 12: SLUS translation
Now that we have translated the graphics and changed the width of our new characters, I think it's time to translate the game.
First we will focus on the SLUS file, it's a tiny file and it contains a few texts:
As you can see these are the messages that appear when you apply the command "Scan" over an enemy, so here we have some space limitations as each one of these messages cannot exceed the lenght of a single line.
To translate these texts we will need the following tool developed by CUE:
slus_msg.zip
Put all those files in the same folder.
Now open slus_msg.asm with any text editor, I recommend you Notepad++. Go to the end of the file where you will see this:

Now you will have to translate those grey texts. Do not delete the quotation marks. After you are done, save and close the file.
Next step, open the file slus_msg.tbl with any text editor. Add your new characters after their corresponding hex code:

When you are done save and close the file.
Now double click the file translate.bat and that's it, now your translated messages are included in the SLUS.
First we will focus on the SLUS file, it's a tiny file and it contains a few texts:
- "HP ????/????"
- "HP #/#"
- "Susceptible to poison"
- "Susceptible to acid"
- "Easily tranquilized"
- "Sensitive to heat"
- "Sensitive to cold"
- "Objects easily stolen"
- "Gets confused easily"
- "Failed to escape"
- "Can't escape!"
As you can see these are the messages that appear when you apply the command "Scan" over an enemy, so here we have some space limitations as each one of these messages cannot exceed the lenght of a single line.
To translate these texts we will need the following tool developed by CUE:
slus_msg.zip
Put all those files in the same folder.
- slus_msg.asm
- slus_msg.tbl
- translate.bat
- SLUS_006.62
- armips.exe
Now open slus_msg.asm with any text editor, I recommend you Notepad++. Go to the end of the file where you will see this:

Now you will have to translate those grey texts. Do not delete the quotation marks. After you are done, save and close the file.
Next step, open the file slus_msg.tbl with any text editor. Add your new characters after their corresponding hex code:

When you are done save and close the file.
Now double click the file translate.bat and that's it, now your translated messages are included in the SLUS.
Tuesday, July 2, 2013
Step 11: width of the new characters II
Some days ago we changed the width of our new characters in the SLUS file. This SLUS file contains the width of the characters that appear in dialogs, but not characters that appear in the menu. Of course this was discovered by CUE.
To change the width for the menus we will have to open the big file called PE.IMG using an hex editor, for instance HxD.
Open HxD
Edit > Search > Go to...
Go to 02B160, and there you will see the characters width. This time we won't have to do any trick with the assembler, just add our new values. You will have to add them after the 51 (do not touch that 51).

When I said that you have to add your new values, I mean that you have to overwrite the old ones (C0) and put yours over.
The structure of these characters is as follows:
For instance, let's focus on the letter "I". It has a value of 41. The "I" itself has a width of 4, and then 1 white space is inserted before and after the character. That's the way it works.
So now you know how to change the width of your new characters. If you need help, here you have the width of the old English characters:
60 -> 0
60 -> 1
60 -> 2
60 -> 3
60 -> 4
60 -> 5
60 -> 6
60 -> 7
60 -> 8
60 -> 9
60 -> +
50 -> -
50 -> =
61 -> *
91 -> %
60 ->
80 -> A
70 -> B
60 -> C
70 -> D
60 -> E
60 -> F
70 -> G
80 -> H
41 -> I
60 -> J
80 -> K
70 -> L
A0 -> M
80 -> N
60 -> O
70 -> P
60 -> Q
80 -> R
60 -> S
60 -> T
80 -> U
80 -> V
A0 -> W
60 -> X
80 -> Y
60 -> Z
80 -> &
21 -> !
51 -> ?
41 -> "
21 -> '
21 -> .
70 -> a
70 -> b
60 -> c
60 -> d
60 -> e
60 -> f
70 -> g
80 -> h
40 -> i
30 -> j
70 -> k
40 -> l
A0 -> m
80 -> n
60 -> o
70 -> p
70 -> q
60 -> r
50 -> s
40 -> t
80 -> u
80 -> v
A0 -> w
60 -> y
80 -> z
50 -> :
21 -> ,
30 -> /
51 (leave this 51 alone as I said before)
To change the width for the menus we will have to open the big file called PE.IMG using an hex editor, for instance HxD.
Open HxD
Edit > Search > Go to...
Go to 02B160, and there you will see the characters width. This time we won't have to do any trick with the assembler, just add our new values. You will have to add them after the 51 (do not touch that 51).

When I said that you have to add your new values, I mean that you have to overwrite the old ones (C0) and put yours over.
The structure of these characters is as follows:
- The first number indicates the width of each character, expressed in pixels.
- The second number indicates the white space before and after the character.
For instance, let's focus on the letter "I". It has a value of 41. The "I" itself has a width of 4, and then 1 white space is inserted before and after the character. That's the way it works.
So now you know how to change the width of your new characters. If you need help, here you have the width of the old English characters:
60 -> 0
60 -> 1
60 -> 2
60 -> 3
60 -> 4
60 -> 5
60 -> 6
60 -> 7
60 -> 8
60 -> 9
60 -> +
50 -> -
50 -> =
61 -> *
91 -> %
60 ->
80 -> A
70 -> B
60 -> C
70 -> D
60 -> E
60 -> F
70 -> G
80 -> H
41 -> I
60 -> J
80 -> K
70 -> L
A0 -> M
80 -> N
60 -> O
70 -> P
60 -> Q
80 -> R
60 -> S
60 -> T
80 -> U
80 -> V
A0 -> W
60 -> X
80 -> Y
60 -> Z
80 -> &
21 -> !
51 -> ?
41 -> "
21 -> '
21 -> .
70 -> a
70 -> b
60 -> c
60 -> d
60 -> e
60 -> f
70 -> g
80 -> h
40 -> i
30 -> j
70 -> k
40 -> l
A0 -> m
80 -> n
60 -> o
70 -> p
70 -> q
60 -> r
50 -> s
40 -> t
80 -> u
80 -> v
A0 -> w
60 -> y
80 -> z
50 -> :
21 -> ,
30 -> /
51 (leave this 51 alone as I said before)
Thursday, June 20, 2013
Step 10: new graphics found
As you know CUE is helping me to romhack this game, and he found these new hidden graphics. Nobody has translated them before, so now it's time to do it once and for all.
These graphics were not in TIM format so that's why I couldn't find them. You need to open the game with a software called Tile Molester.
Open the big file called PE.IMG using Tile Molester. Then do the following:
Navigate > Go to > Offset: 0004E814
View > Codec > 4bpp linear, reverse-order
View > Mode > 2-dimensional
Image > Canvas size > 32 x 32
And voilà:

As you can see this is not the real color palette, but at least we have found what we were looking for. Now let me show you how to change the color palette. The palettes are stored just below the graphics (thanks Lyan for letting me know). Go to Palette > Import from... > This file
Then do this:

Click OK. The first 128 palettes will be loaded. 2048 / 16 colors = 128 palettes
Now you can change the palette using the arrows:

For instance, this palette is the number 7, and it's the palette used by the yellow letters in the menu.I recommend you to save this palette in the bookmarks (Palette > Add to palettes).
Here you have the result:

Now you will have to edit and translate those words very carefully. There's a lot of things to translate in here, so be patient. You will need a lot of zoom to finish all these details. Here you have the final result:

Now it's time to translate the other texts, icons, etc. Change the palette using the arrows until you find the real colors of each icon, translate what needs to be translated, and then save the file.
For instance, the palette number 25 shows you the proper colors of the "Game Over" graphic:

Palette number 26 shows you the proper color of these icons:

And so on, and so on.
Here you have the final result:


These graphics were not in TIM format so that's why I couldn't find them. You need to open the game with a software called Tile Molester.
Open the big file called PE.IMG using Tile Molester. Then do the following:
Navigate > Go to > Offset: 0004E814
View > Codec > 4bpp linear, reverse-order
View > Mode > 2-dimensional
Image > Canvas size > 32 x 32
And voilà:

As you can see this is not the real color palette, but at least we have found what we were looking for. Now let me show you how to change the color palette. The palettes are stored just below the graphics (thanks Lyan for letting me know). Go to Palette > Import from... > This file
Then do this:

Click OK. The first 128 palettes will be loaded. 2048 / 16 colors = 128 palettes
Now you can change the palette using the arrows:

For instance, this palette is the number 7, and it's the palette used by the yellow letters in the menu.I recommend you to save this palette in the bookmarks (Palette > Add to palettes).
Here you have the result:

Now you will have to edit and translate those words very carefully. There's a lot of things to translate in here, so be patient. You will need a lot of zoom to finish all these details. Here you have the final result:
Now it's time to translate the other texts, icons, etc. Change the palette using the arrows until you find the real colors of each icon, translate what needs to be translated, and then save the file.
For instance, the palette number 25 shows you the proper colors of the "Game Over" graphic:
Palette number 26 shows you the proper color of these icons:
And so on, and so on.
Here you have the final result:


Wednesday, June 19, 2013
Step 9: width of the new characters
As I said before, the width of the dialog characters are stored in the SLUS file.
In order to change them we need a tool called ARMIPS.
Thanks to the assembler programming language, we are allowed to modify certain things in the SLUS. So let me show you how it's done. CUE developed a little tool which allow us to modify the width of our new characters, because their default width is always 12 pixels and that's too much:

In the picture above you can see what I'm talking about. The letter "é" has a 12 pixel width where it should be 7, and the letter "ó" also has a 12 pixel width where it should be 7 as well, so let's change that.
First of all, download this: armips (slus width).zip
Unzip those files and keep them in the same folder.
Now open the file "width.asm" with any text editor, I recommend you Notepad++.
Go to the end of the file, where you will see this:

After "db" you have to insert the width of your new characters. For your information they are expressed in pixels, so the Á has 8 pixels, É has 7 pixels, and so on and so on. Obviously each character has its own width, so add them very carefully. You can see the original width of each character in the same document, just above the new ones. On the last column you can add the new characters after their corresponding hex code, just as I have done in the picture above.
When you are done save this document. Now double click the Magic.bat file. Congratulations, now you have added the new characters width into the SLUS file.
What we have done allowed us to change the width of our new characters regarding ingame dialogs, but not the texts that appear in the menu. We will see that in the next episode.
Friday, June 7, 2013
Step 8: understand hexadecimal codes
Before extracting and translating the texts we have to understand something: the PSX is a computer, and computers don't understand nor read our language. It uses binary systems, so that means that all texts are stored in binary format.
There are tools that allow us to read those binary files and convert them to hexadecimal code. But we cannot read hexademical codes either, we need to convert those hex codes to our alphabet. Let's focus on our Parasite Eve project. You may remember the character set that we have extracted earlier:
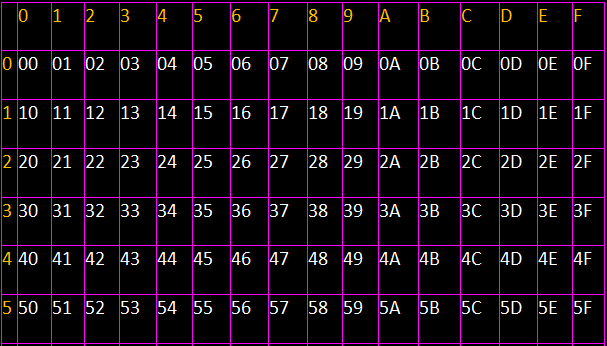
 Each one of these characters that you are seeing have assigned a unique hex code. How can we know which hex code belongs to each character? Well, in this case it's very easy, let's see an hex code table:
 You get the idea, right? The position of each character in the matrix tells us which code it has assigned. In Parasite Eve, the equivalence is the following:
00=0
01=1
02=2
03=3
04=4
05=5
06=6
07=7
08=8
09=9
0A=+
0B=-
0C==
0D=*
0E=%
0F=
10=A
11=B
12=C
13=D
14=E
15=F
16=G
17=H
18=I
19=J
1A=K
1B=L
1C=M
1D=N
1E=O
1F=P
20=Q
21=R
22=S
23=T
24=U
25=V
26=W
27=X
28=Y
29=Z
2A=&
2B=!
2C=?
2D="
2E='
2F=.
30=a
31=b
32=c
33=d
34=e
35=f
36=g
37=h
38=i
39=j
3A=k
3B=l
3C=m
3D=n
3E=o
3F=p
40=q
41=r
42=s
43=t
44=u
45=v
46=w
47=x
48=y
49=z
4A=:
4B=,
4C=/
By the way, 0F is a blank space in case you didn't notice. Additionally we added new Spanish characters:

So their equivalence will be the following:
4D=Á
4E=É
4F=Í
50=Ó
51=Ú
52=á
53=é
54=í
55=ó
56=ú
57=¿
58=¡
59=ñ
5A=Ñ
5B=ü
5C=Ü
So now that we understand hex codes, we can continue our translation project. In the next episode we will focus on how to change the width of these new characters, as their default widht is 12 pixels and that's too much.
There are tools that allow us to read those binary files and convert them to hexadecimal code. But we cannot read hexademical codes either, we need to convert those hex codes to our alphabet. Let's focus on our Parasite Eve project. You may remember the character set that we have extracted earlier:
00=0
01=1
02=2
03=3
04=4
05=5
06=6
07=7
08=8
09=9
0A=+
0B=-
0C==
0D=*
0E=%
0F=
10=A
11=B
12=C
13=D
14=E
15=F
16=G
17=H
18=I
19=J
1A=K
1B=L
1C=M
1D=N
1E=O
1F=P
20=Q
21=R
22=S
23=T
24=U
25=V
26=W
27=X
28=Y
29=Z
2A=&
2B=!
2C=?
2D="
2E='
2F=.
30=a
31=b
32=c
33=d
34=e
35=f
36=g
37=h
38=i
39=j
3A=k
3B=l
3C=m
3D=n
3E=o
3F=p
40=q
41=r
42=s
43=t
44=u
45=v
46=w
47=x
48=y
49=z
4A=:
4B=,
4C=/
By the way, 0F is a blank space in case you didn't notice. Additionally we added new Spanish characters:
So their equivalence will be the following:
4D=Á
4E=É
4F=Í
50=Ó
51=Ú
52=á
53=é
54=í
55=ó
56=ú
57=¿
58=¡
59=ñ
5A=Ñ
5B=ü
5C=Ü
So now that we understand hex codes, we can continue our translation project. In the next episode we will focus on how to change the width of these new characters, as their default widht is 12 pixels and that's too much.
Subscribe to:
Posts (Atom)